


Complete Guide for setup
Developing an Android app can feel like a daunting task, especially if you’re new to coding or app development. But with Android Studio, the process becomes much more accessible and efficient. Android Studio is the official Integrated Development Environment (IDE) for Google’s Android operating system, and it’s packed with tools and features designed to make app development seamless.
What is Android Studio?
Overview of Android Studio
Android Studio is an IDE specifically tailored for Android app development. Launched by Google in 2013, it offers developers a complete suite of tools to design, build, and debug apps for Android devices. With its intuitive interface, developers can write code, test apps, and manage project resources all within a single platform.
History and Evolution
Before Android Studio, Eclipse was the go-to IDE for Android development. However, due to limitations in performance and features, Google introduced Android Studio, which is based on IntelliJ IDEA by JetBrains. Over the years, it has become the standard for Android app development.
Importance of Android Studio in App Development
Why Choose Android Studio?
The reasons to choose Android Studio for your app development are numerous. First, it’s the official IDE by Google, ensuring up-to-date tools, extensive support, and easy integration with Google services. Additionally, it offers powerful features like real-time error detection, code completion, and an extensive library of tools and templates.
Features That Set It Apart
Android Studio is packed with features that make it stand out from other development environments. From the code editor to the layout editor, every tool is designed with Android developers in mind. Its seamless integration with Android Jetpack, Gradle, and version control tools further cements its position as a top-tier choice.
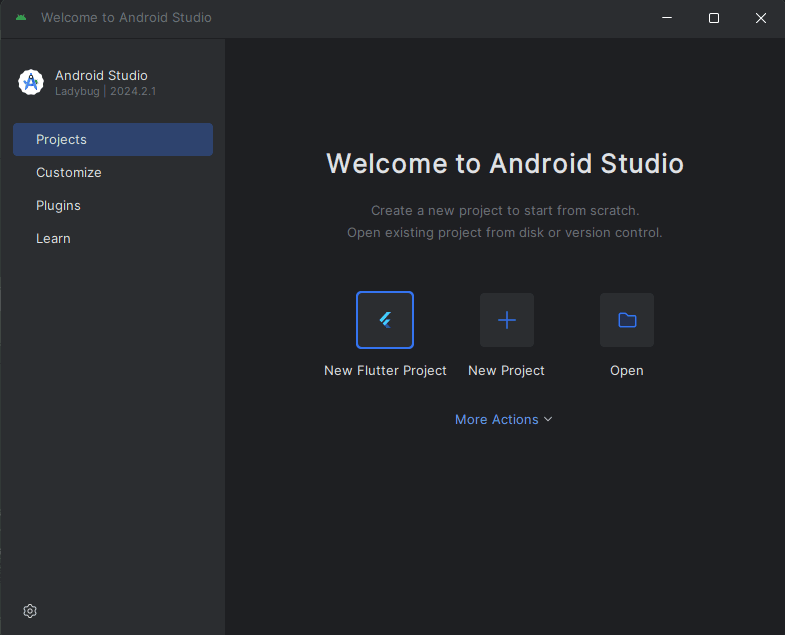
Getting Started with Android Studio
System Requirements and Installation
Operating System Requirements
Before installing Android Studio, it’s crucial to ensure your system meets the necessary requirements. It supports Windows, macOS, and Linux, and requires at least 8GB of RAM, though 16GB is recommended for smoother operation.
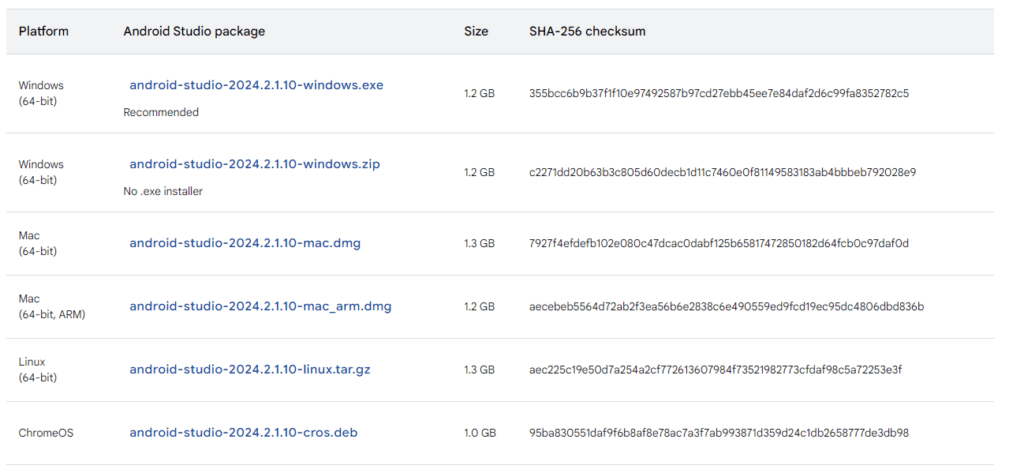
How to Install Android Studio
To install Android Studio:
- Download the installer from the official Android developer site.
- Follow the on-screen instructions to set up the IDE.
- Install the Android SDK and any necessary tools.
Initial Setup and Configuration
Setting up the Development Environment
Once installed, the next step is to configure your development environment. This includes setting up the Android SDK, which contains essential libraries and tools for building Android apps. You’ll also want to ensure that your JDK (Java Development Kit) is correctly configured.
Configuring the SDK and Emulator
The emulator is a key feature of Android Studio that allows you to test your app on virtual devices. After configuring your SDK, you can create a virtual device by going to Tools > AVD Manager and setting up an emulator that mimics a real Android device.
Key Features of Android Studio
Code Editor and Smart Suggestions
Writing Code Efficiently
The code editor in Android Studio is smart. It offers real-time suggestions, auto-completion, and quick access to common libraries, helping you write code faster and with fewer errors.
Code Navigation Tips
Using features like Go to Definition and Find Usages, you can quickly navigate through large codebases. This makes it easier to maintain and refactor your code.
Layout Editor and Designing UI
Drag-and-Drop Interface
Android Studio offers a visual layout editor that allows you to drag and drop UI components like buttons and text fields, making it easy to design your app’s interface.
Responsive Design Tools
You can design layouts for various screen sizes and orientations, ensuring your app looks great on devices ranging from small phones to large tablets.
Emulator and Device Testing
Setting Up the Emulator
The emulator simulates different Android devices, allowing you to test your app across various configurations. You can adjust the screen size, OS version, and hardware features to mimic a wide range of real-world devices.
Testing Apps on Real Devices
While the emulator is great, testing on real devices is crucial for accurate performance testing. Android Studio lets you easily connect your device and run your app via USB debugging.
Debugging and Troubleshooting Tools
Using Logcat and Breakpoints
Android Studio’s Logcat allows you to view system messages, helping you debug issues with your app. You can also use breakpoints to pause execution and inspect the state of your application.
Solving Common Android Development Issues
Whether it’s a memory leak or a crashing app, Android Studio provides a suite of tools for debugging and fixing common issues, making your app stable and performant.
Advanced Features and Tips
Build Automation with Gradle
What is Gradle?
Gradle is a build automation tool that Android Studio uses to compile and package your app. It automates tasks such as building APKs, managing dependencies, and more.
Automating Builds in Android Studio
By customizing Gradle scripts, you can automate various parts of your app’s build process, saving time and reducing errors.
Version Control Integration
Git Integration and Workflow
Android Studio integrates seamlessly with Git, allowing you to manage your code versions, collaborate with team members, and track changes directly within the IDE.
Collaborating with Teams Using Version Control
Through version control tools like GitHub or Bitbucket, you can share your project, track bugs, and merge code changes with your team.
Android Jetpack Integration
What is Android Jetpack?
Android Jetpack is a set of libraries and tools that help developers build high-quality apps faster. It includes components like Navigation, LiveData, and Room for database management.
Key Components of Android Jetpack
Jetpack simplifies complex tasks like data persistence, UI navigation, and lifecycle management, ensuring a smoother development process.
App Profiling Tools
Monitoring App Performance
Android Studio’s profiling tools allow you to monitor your app’s performance in real-time. You can track
FAQ:
Android Studio provides performance profilers so you can easily track your app’s memory and CPU usage, find deallocated objects, locate memory leaks, optimize graphics performance, and analyze network requests.
Android Studio supports all the same programming languages of IntelliJ (and CLion) e.g. Java, C++, and more with extensions, such as Go; and Android Studio 3.0 or later supports Kotlin, and “Android Studio includes support for using a number of Java 11+ APIs without requiring a minimum API level for your app”.
4 GB RAM minimum, 8 GB RAM recommended. 2 GB of available disk space minimum, 4 GB Recommended (500 MB for IDE + 1.5 GB for Android SDK and emulator system image)
Android Studio system requirements
64-bit Microsoft® Windows® 8/10/11.
x86_64 CPU architecture; 2nd generation Intel Core or newer, or AMD CPU with support for a Windows Hypervisor.
8 GB RAM or more.
8 GB of available disk space minimum (IDE + Android SDK + Android Emulator)
1280 x 800 minimum screen resolution.
Android Studio creates a Java file with skeleton code that you can modify. It opens the file in the Code Editor. Note: You can create a singleton class by selecting File > New > Singleton or File > New > Java Class; the latter technique offers more options.